So you want to do a pull-up, eh?
Well you’ve arrived at the right place!
Pull-ups are one of my favorite exercises. Today, I’ll share the exact program we use to help our Online Coaching clients lift themselves up.
Here’s what we’ll cover:
- What are the benefits of doing pull-ups? What muscles do pull-ups work?
- How to do a pull-up (proper form and technique).
- How to get your first pull-up.
- Pull-ups vs. chin-ups (what’s the difference?)
- 5 common mistakes when doing a pull-up.
- Advanced pull-up variations.
- How to do weighted pull-ups.
- How to include pull-ups in your workout.
Real quick…if you’re just starting your strength training journey, check out our massive guide Strength Training 101: Everything You Need to Know.
You can snag it for free when you enlist in the Rebellion (that’s us!) by signing up below:
Okie dokie, let’s do this.
What Are the Benefits of Doing Pull-Ups? What Muscles Do Pull-Ups Work?

Pull-ups are one of the best exercises you can do.
You want some specifics?
You got it!
Here’s are the benefits of doing pull-ups:
#1) Pull-ups work every muscle in your upper body. Pull-ups are what we call a “compound exercise,” meaning they work out several muscle groups at once.
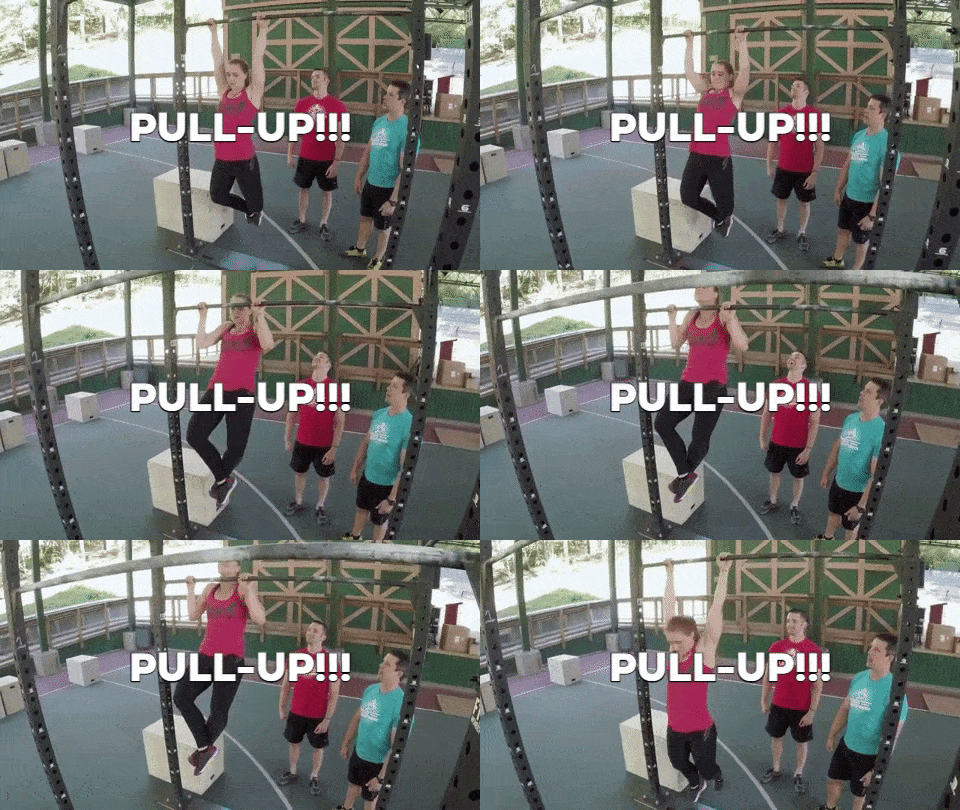
The muscles in your back, arms, and even abs all grow stronger from doing pull-ups.
Abs?
Yep! You engage your abs as you stabilize your body while hoisting yourself up.
#2) Pull-ups are a great indicator of overall strength. Since it’s just you against the force of gravity, if you can do a pull-up or chin-up, you have a greater strength-to-bodyweight ratio.
With push-ups, some of your body’s weight is supported by your feet.
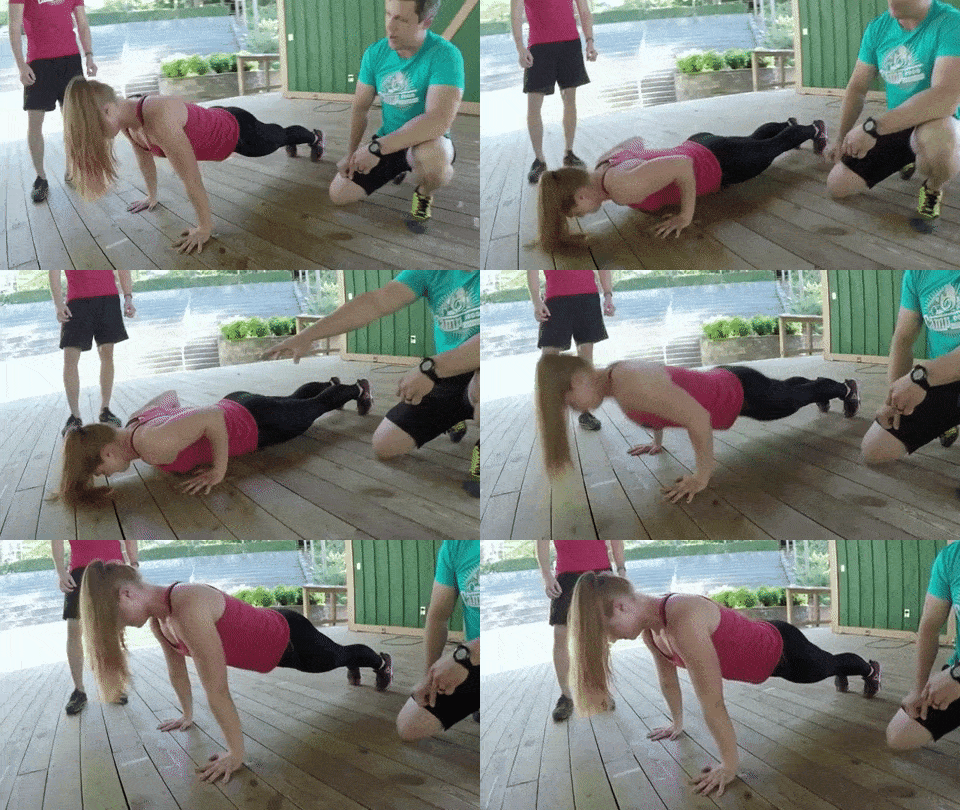
Not so with pull-ups. It’s just you and the bar.
#3) Pull-ups will help you improve your posture.[1] By building strength in your PULL muscles, we strengthen and tighten your back muscles.
This will naturally cause you to pull your shoulder blades back and down into proper position, providing you a better posture.
#4) Pull-ups improve grip strength. Grip strength is another indicator of overall health. In fact, a strong grip has been correlated with lower mortality rates.[2]
Pull-ups are a great way to improve your grip since your hands and fingers have to support your body’s weight during the movement.
If you’re looking for a stronger handshake, regularly doing pull-ups will go a long way towards that goal.
A quick note: we have a full guide on improving your grip strength if you’d like to learn more.
#5) Pull-ups are convenient. Some other big compound movements require decent amounts of equipment to perform, like the deadlift or bench press. Meaning unless you have weights, barbells, and power racks at your home, you’re probably heading to the gym for your training.
Not so with pull-ups.
Doing a pull-up really only requires a pull-up bar, but even that can be substituted.
You can use monkey bars at a local playground, a towel around a strong beam, or even a sturdy tree:

If it’s taller than you and can support your weight, you can do pull-ups from it.[3]
Alright, enough about why you should do pull-ups. Let’s show you how it’s done.
How to Do Proper Pull-Ups
HOW TO DO A PULL-UP, STEP-BY-STEP:
- Grab a bar with a grip slightly wider than shoulder-width, with your hands facing away from you.
- Hang all the way down.
- Pull yourself up until your chin is above the bar.
- Slight pause
- Lower yourself all the way back down.
That’s it!
You may be thinking, “That’s all well and good Steve, but what if you can’t even do a pull-up yet! What should I do?”
Don’t panic!

I got you covered boo.
I’m going to share with you the exact pull-up progression plan we use within Nerd Fitness Journey to help folks get their first chin-up.
Which you can try for free (no credit card needed) right here:
How to Get Your First Pull-Up
The above video and section are taken from our guide “Get Your First Pull-up.”
If you can’t quite hoist yourself up yet, don’t fret!
We’re going to work on increasing your “pull” muscles through a series of exercises.
First up…
Level 1 Pull-up Workout: Bent Over Dumbbell Rows
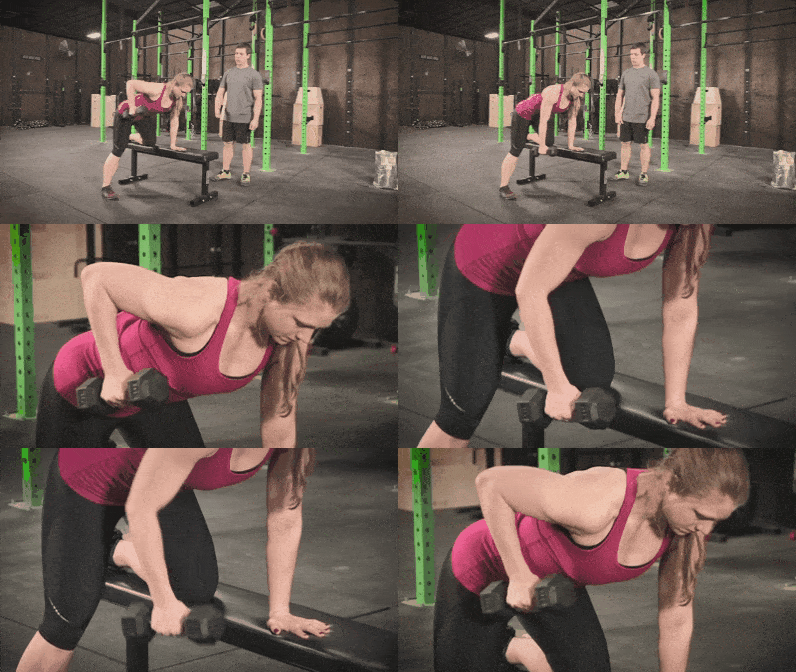

Your bent-over dumbbell rows workout will be:
- 8 reps each arm (or as many as you can do)
- Rest for a 2-minute break
- Do another set
- Repeat until you hit 3 sets
What weight should you start out with initially?
Whatever allows you to get to at least 5 reps a set.
Once you can do 3 sets of 8 reps (each arm), it’s time to pick up a heavier dumbbell.
This will allow you to get stronger and stronger.
When you can lift a 25-pound (10kg) dumbbell or heavier, consider moving up to the next level.
Level 2 Pull-Up Workout: Inverted Bodyweight Rows
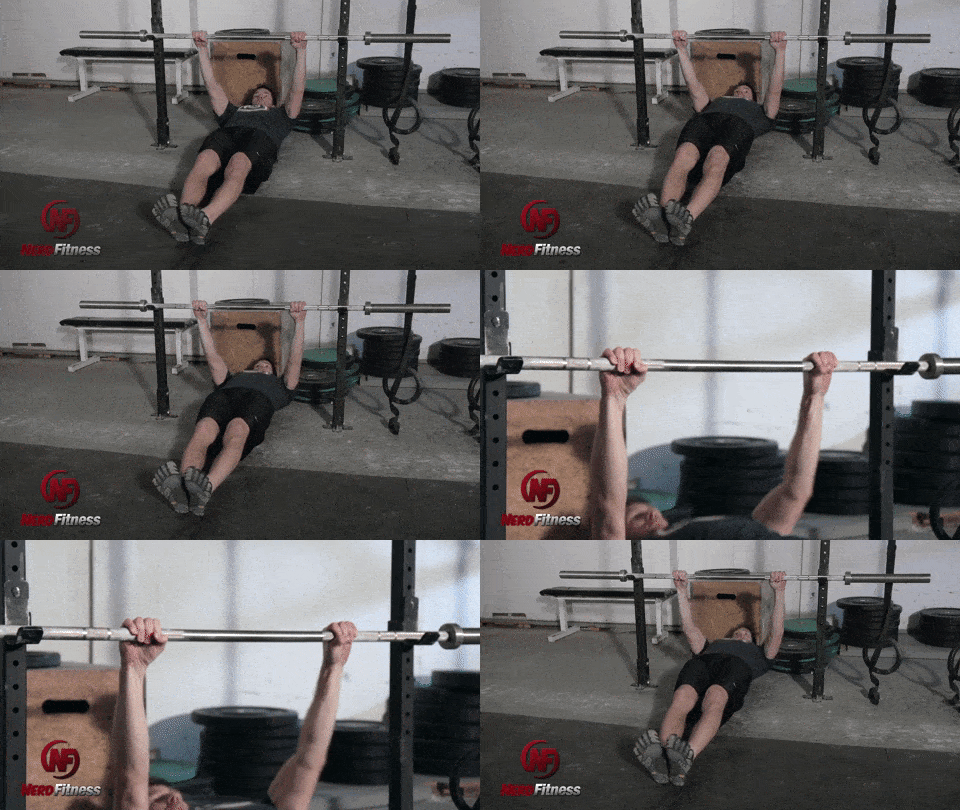

Bodyweight rows are the PERFECT precursor to pull-ups – they work the same muscles, and have you lifting your own bodyweight, just at a different angle.
Our goal here will be to work towards a lower and lower angle, increasing the difficulty of the movement.
So at first, we’ll do rows with the bar higher up:
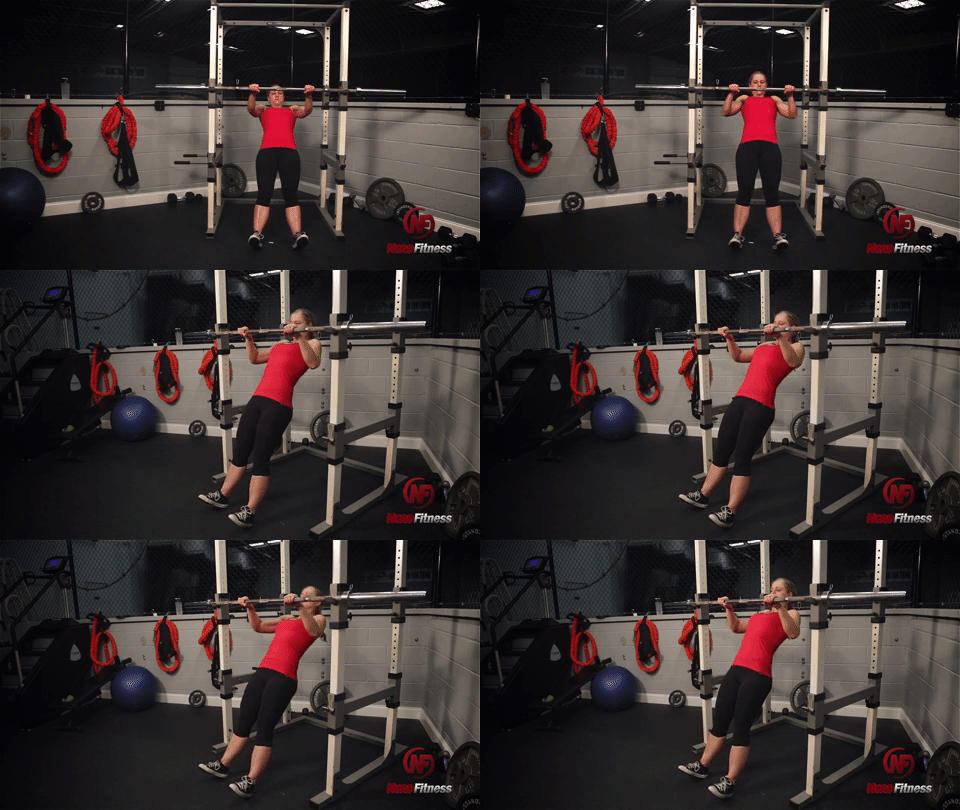

Then we’ll progress to getting the bar lower:
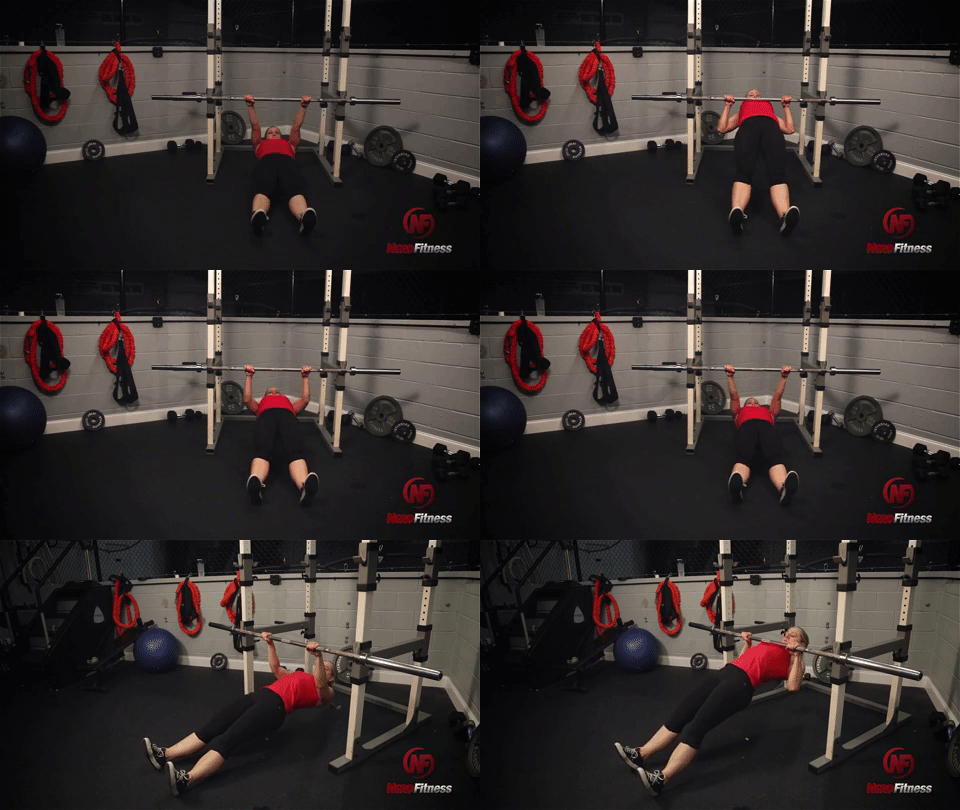

As soon as you’re doing bodyweight rows where your body is at a 45-degree angle or lower, you can progress to the next level.
Level 3 Pull-Up Workout: Assisted Pull-Ups
At this point, you are going to start actually doing pull-ups…with a little bit of assistance.
We’ve got a few options for you.
#1) Assisted Pull-ups with Chair
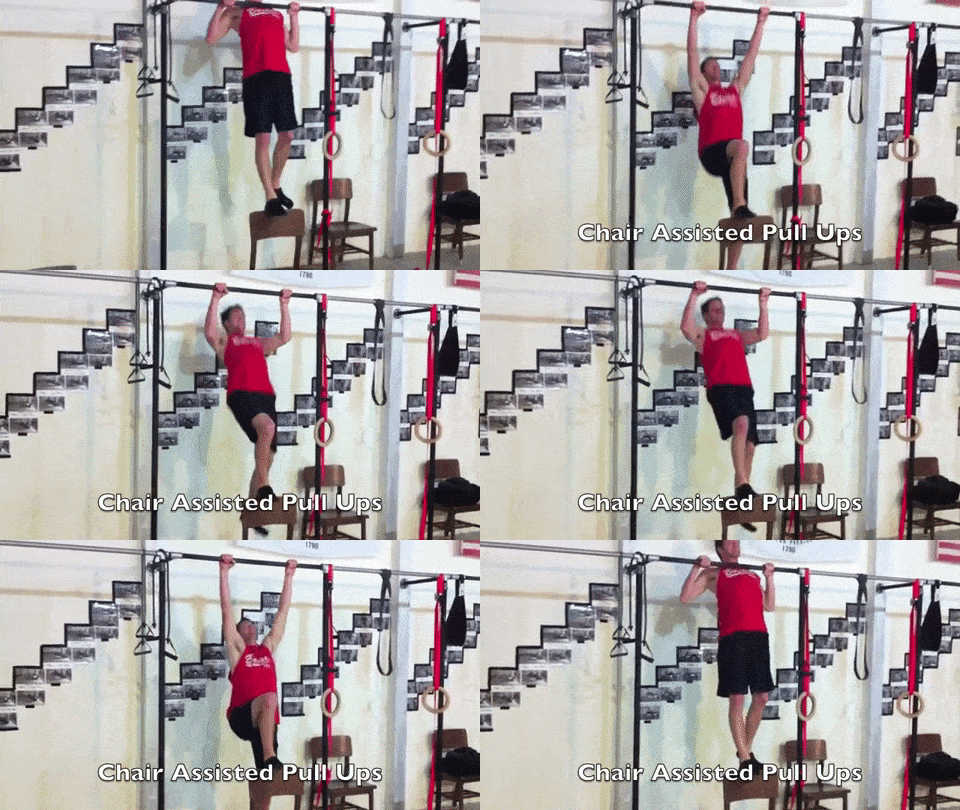

Either one foot or two on the chair, depending on your needs. Your feet are ONLY there for support, use your upper body as much as possible.
#2) Assisted Pull-ups with an Exercise Band
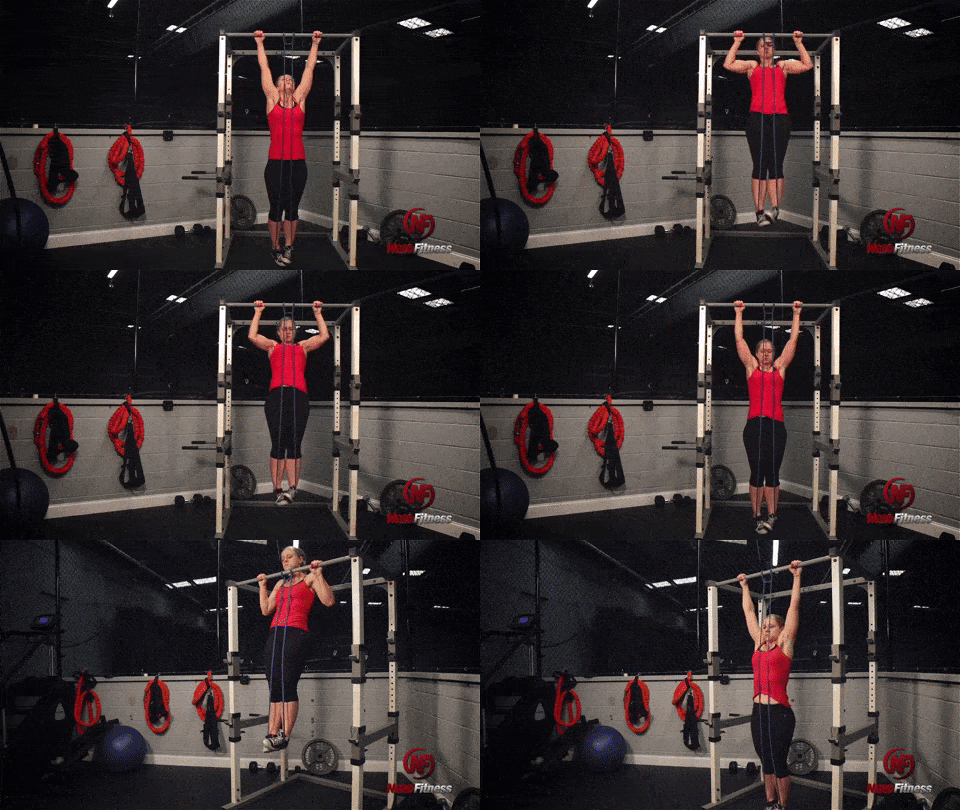

You can get different types of exercise bands with different levels of strength, or a variety pack for easy progression.
Put your foot in the exercise band and pull yourself up.
#3) Assisted Pull-Ups with a Partner
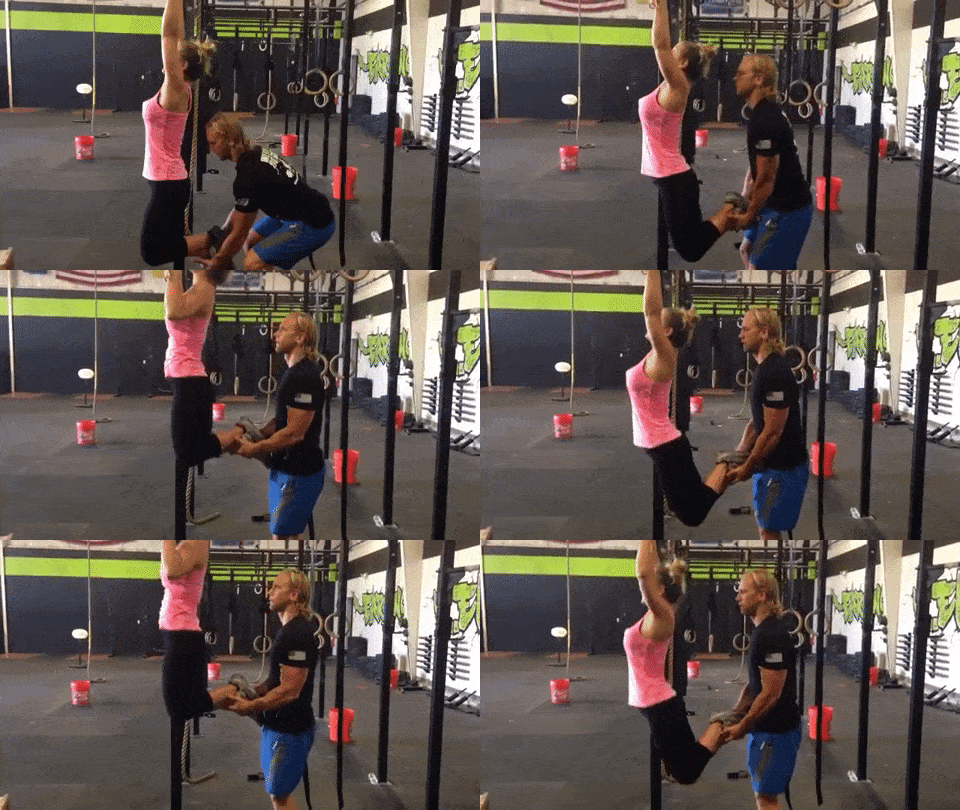

Have a friend hold your feet behind you and help you complete each rep. Have them use the least amount of help possible to get you through your workouts.
Once you’re comfortable doing a form of assisted pull-ups, and can do about 10 repetitions, it’s time to advance to the next level.
This is probably the TOUGHEST level before getting your pull-ups. If you get stuck on “assisted pull-ups” and “assisted chin-ups”, you’re not alone. This is where most people get stuck.
That’s why we created a specific program within Nerd Fitness Journey to get people up to the bar.
You can try it for free right here:
Level 4 Pull-Up Workout: Negative Pull-Ups
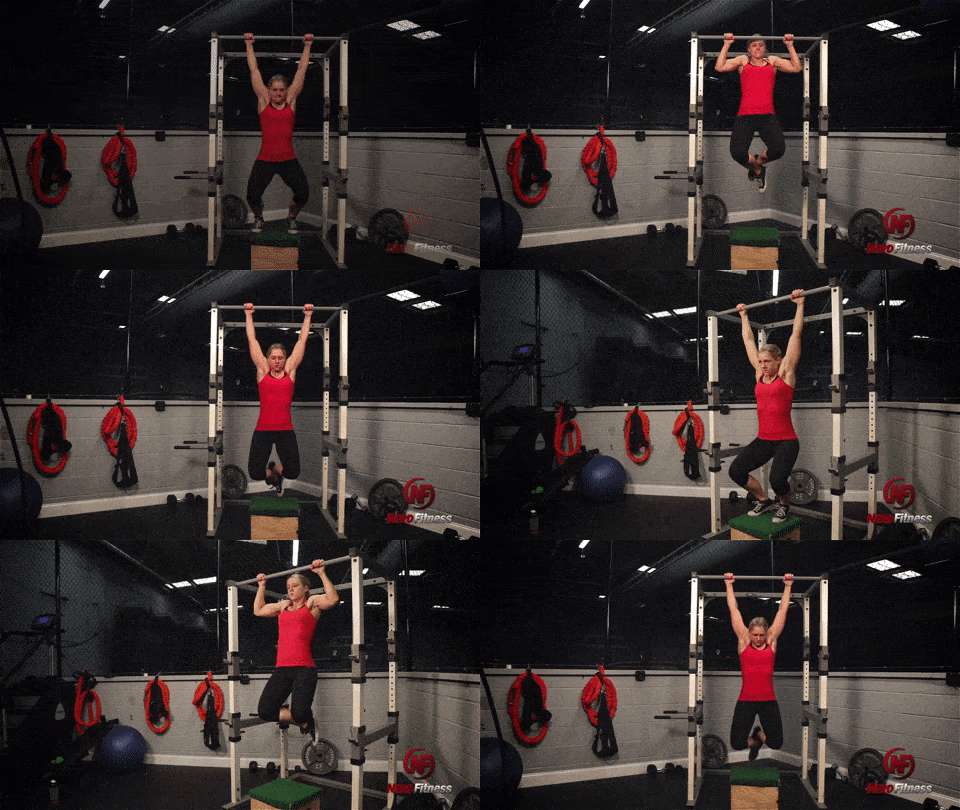

Our next level on our path for a pull-up is what we call “negative pull-ups.”
- Grab onto the bar with an overhand grip
- Jump so your chest is touching
- Slowly lower yourself under control until you’re at the bottom of the movement.
As you continue to lower yourself down, you’ll build strength, eventually creating enough muscle so you can pull yourself up.
If you want more specific instructions on any of these levels or movements, check out our guide “Get Your First Pull-up” for more.
Pull-Ups vs. Chin-Ups (What’s the Difference?)
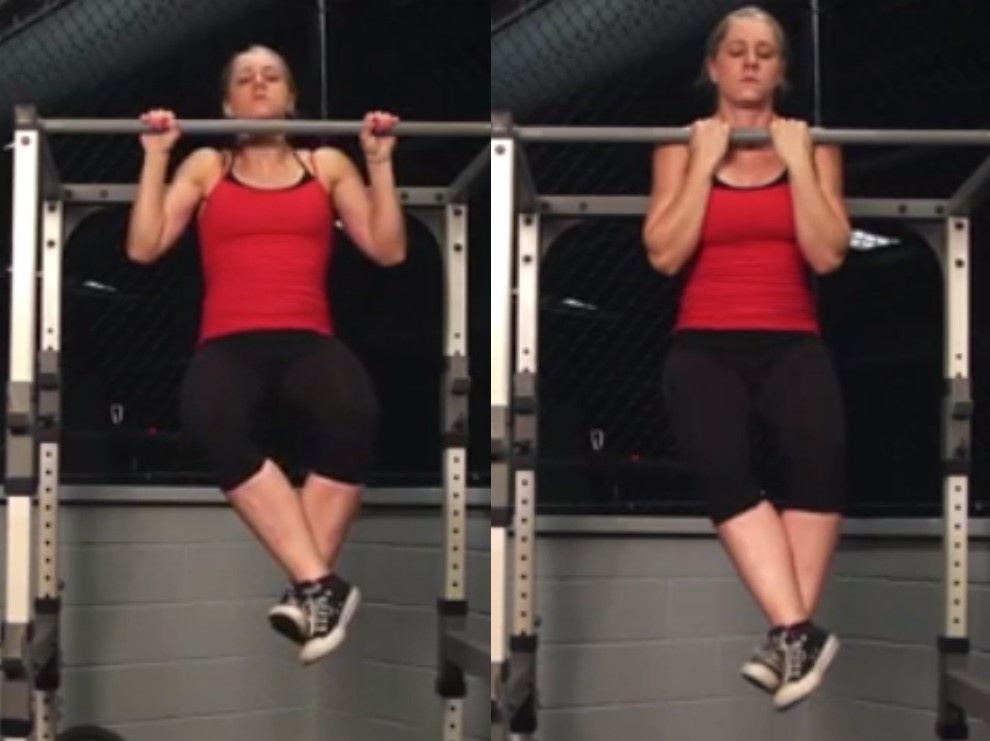

You may hear the term “pull-up” and “chin-up” used interchangeably.
However, there is a difference, so definitions are in order:
A PULL-UP is when your hands are facing away from you.
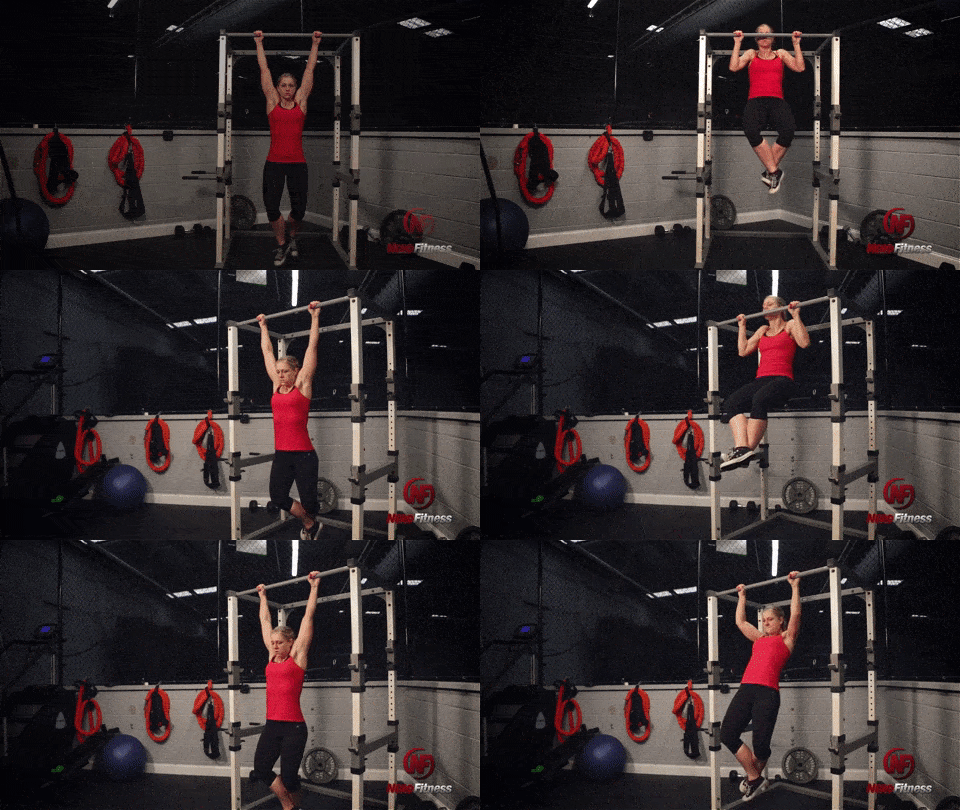

This will work your back and biceps.
A CHIN-UP is when your hands are facing towards you.
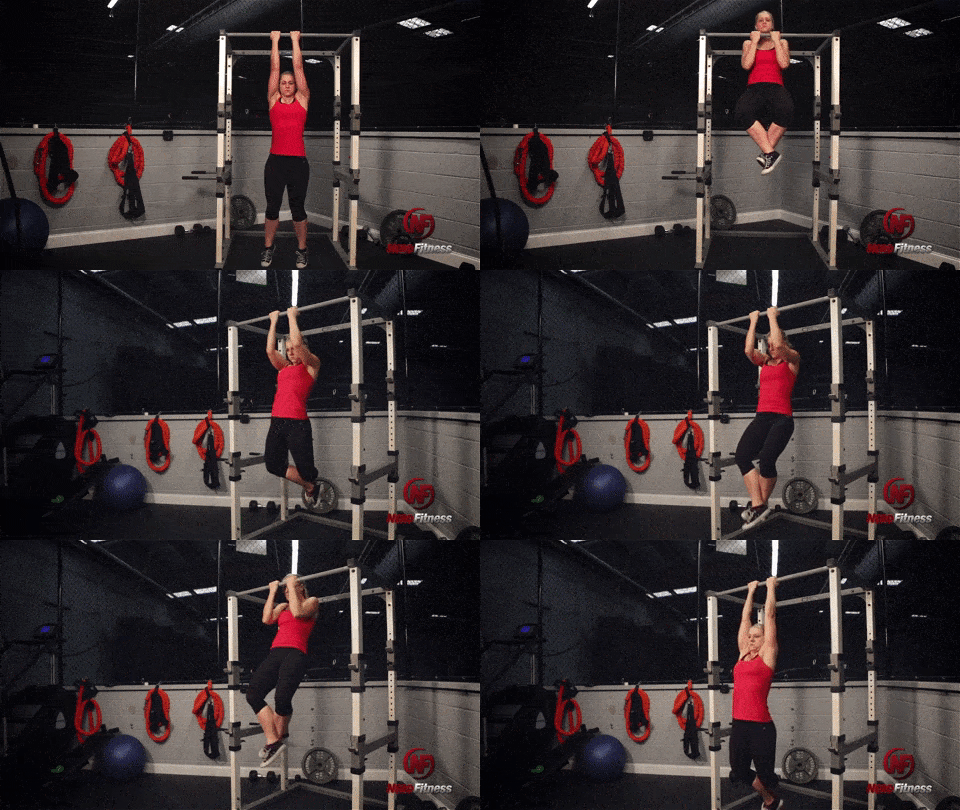

Although this also works your back, it has more emphasis on your biceps.
Are chin-ups easier than pull-ups?
Yes, chin-ups are generally easier to perform than pull-ups. The wider grip of a pull-up isolates your lats, which means you get less assistance from your biceps.
We recommend including both chin-ups AND pull-ups into your workout, which we’ll discuss in our section on including pull-ups into your training.
5 Common Mistakes When Doing a Pull-Up
Mistake #1: You don’t extend low enough or pull high enough.
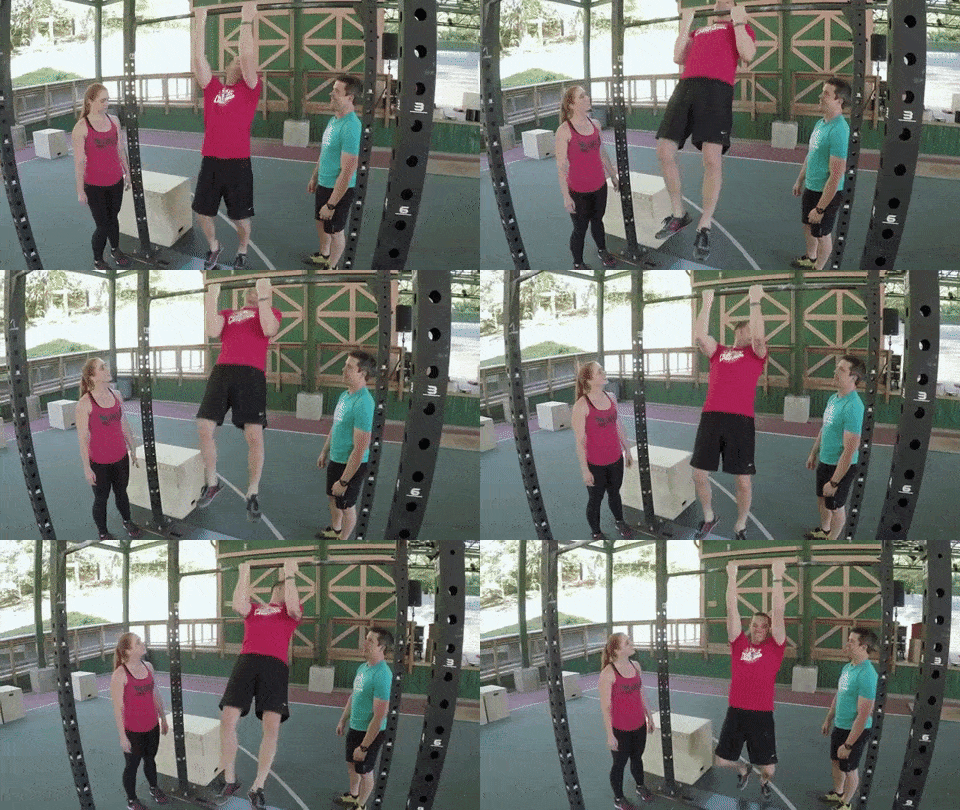

Full extension and a full range of motion are major problems for many people training pull-ups and chin-ups. Most people I see in the gym are doing half pull-ups. Either not pulling high enough, not dropping low enough, or both! It’s not a full rep, and it’s robbing your body of effective work.
Solution:
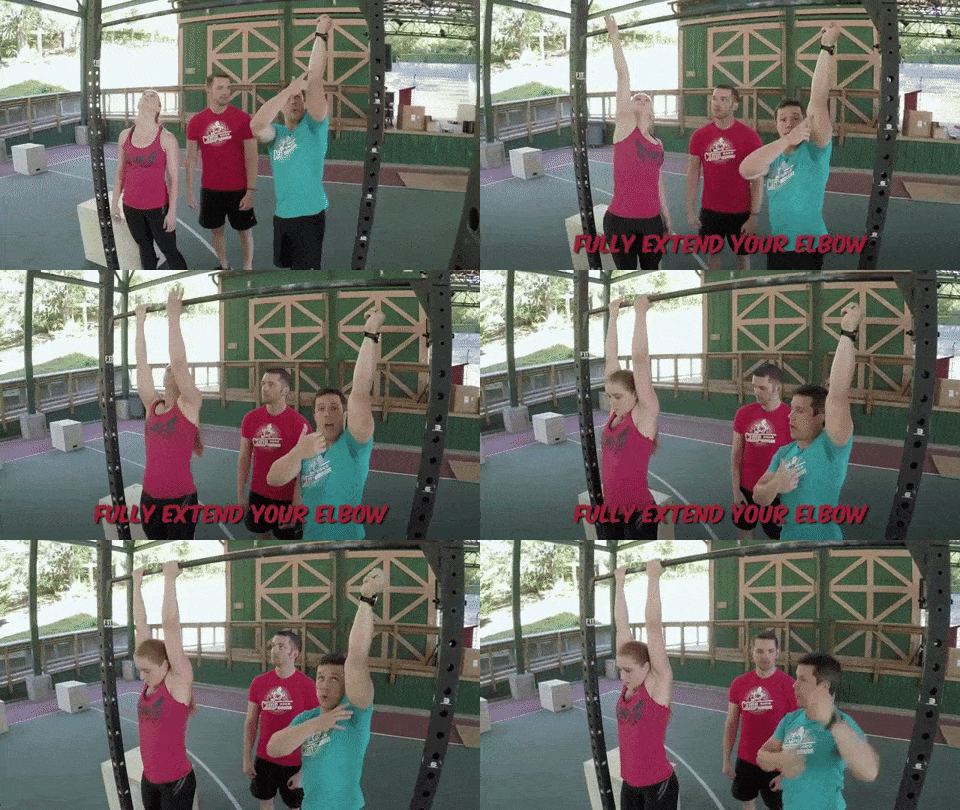

With each repetition you want your body to be in a straight line at the bottom – keep your elbows extended and your shoulder relaxed slightly up to your ears. Full range of motion for the win! Better to do a few proper pull-ups than more half-rep ones.
Mistake #2: You don’t engage your shoulders at the start.
Another problem I see with people is not setting their shoulders properly when they start their pull-ups, which can put unnecessary strain on your joints/tendons/muscles. It can also be the difference between being able to get your first pull-up or chin-up and flailing around on the bar!
Solution:


Imagine pinching a pen in between your shoulder blades, then do the pull-up. In other words, pull your shoulders down and back before you bend your elbows to pull up. This puts us in a far more efficient position. By not using our back and shoulder muscles fully, over the long run we’ll be weaker and at a higher risk for injury.
Mistake #3: You’re doing too hard a variation.
Whether it’s lack of strength or too much body mass, you should choose a variation that allows you to have great form while getting stronger. Use a box, an assisted band, or an assisted pull-up machine to start at a low weight and build up your strength.
Solution: Always do proper pull-ups and chin-ups. Get your chin over the bar from a hang with every rep, and maintain good form. If you find yourself committing the mistakes on this list, make your variation easier.
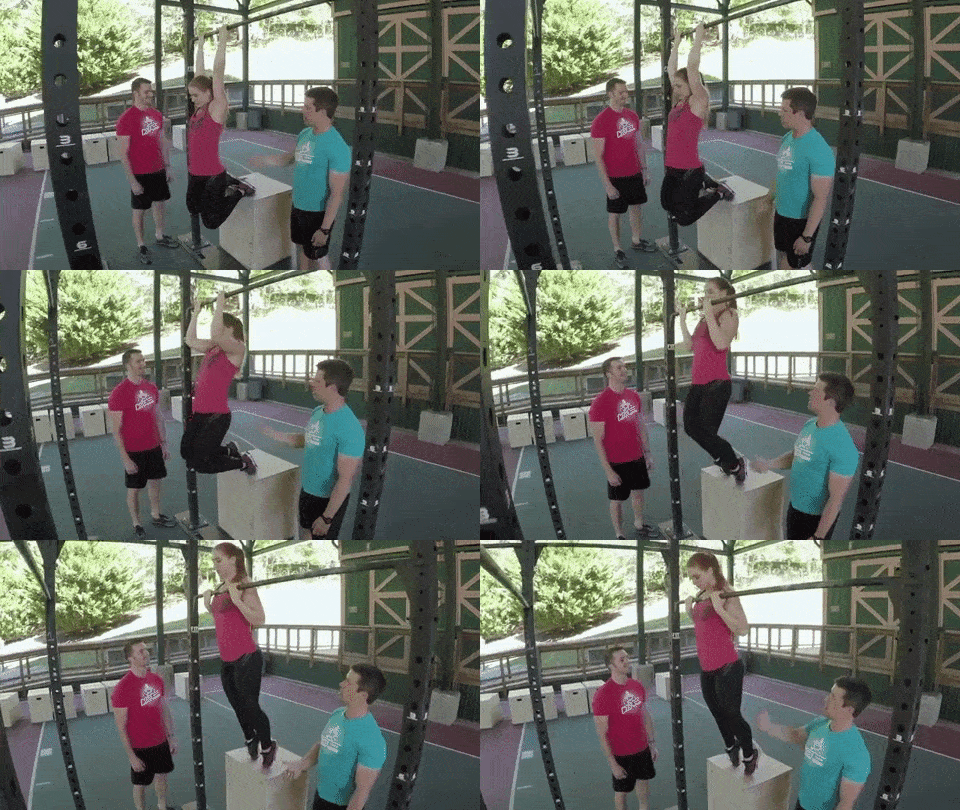

Mistake #4: Not engaging your shoulders at the top.
Many people will get a good extension at the bottom of their chin-up and start with great form. But then as they perform the movement, they’ll find their shoulders in a poor position at the top.
A classic sign this is happening is if the chest/neck doesn’t touch the bar, or the body curls inward significantly at the top.
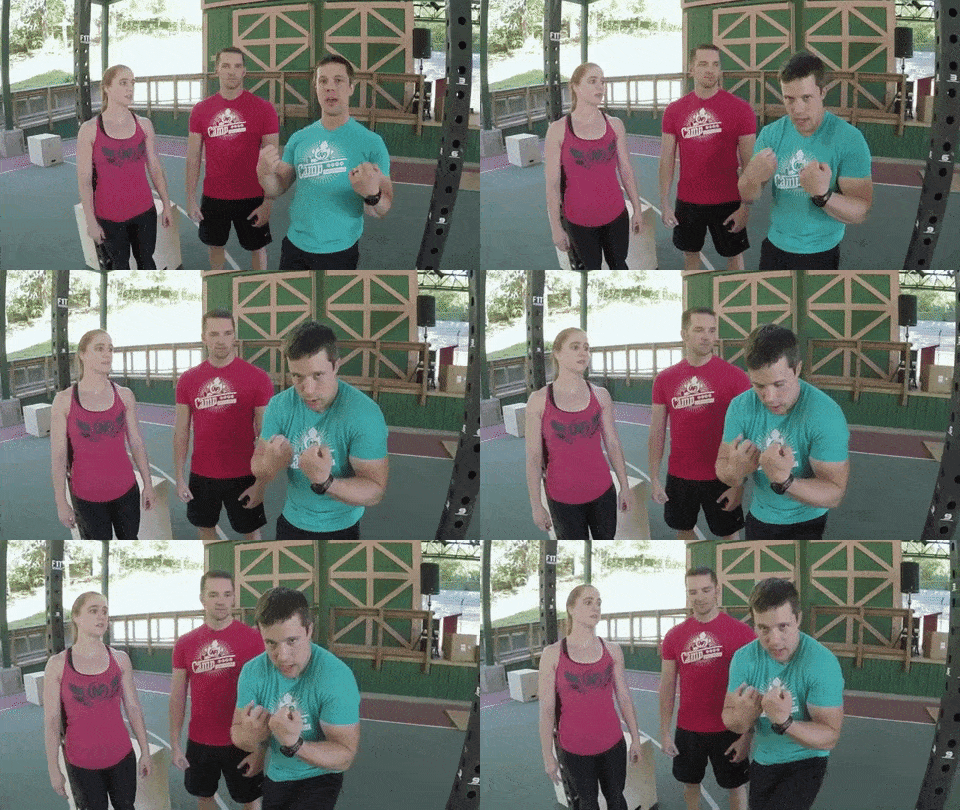

Is your shoulder elevated to the ears or rolled forward? Are you shrugging your shoulders as you’re struggling to get above the bar?
Solution: Make your variation easier by working on an assisted chin-up and maintaining a strong shoulder position at the top.
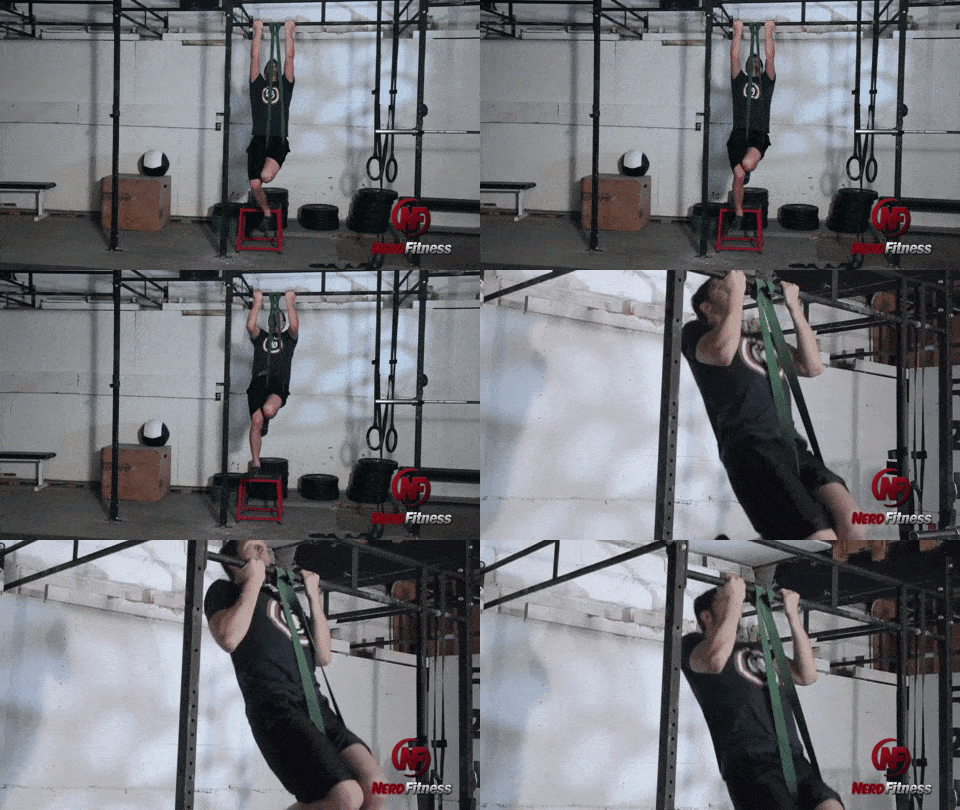

Keep your shoulders down and back and engaged through the movement.
A chin over the bar is a chin-up – we aren’t trying to take away your chin-up if you aren’t getting your chest to the bar. But consider this a progression to even better form so you can eventually work on harder skills like pull-up variations or the legendary muscle-up.
Mistake #5: You use violent kipping motions to do your pull-ups or chin-ups.
We know CrossFitters use the kip to get more pull-ups in a short amount of time.
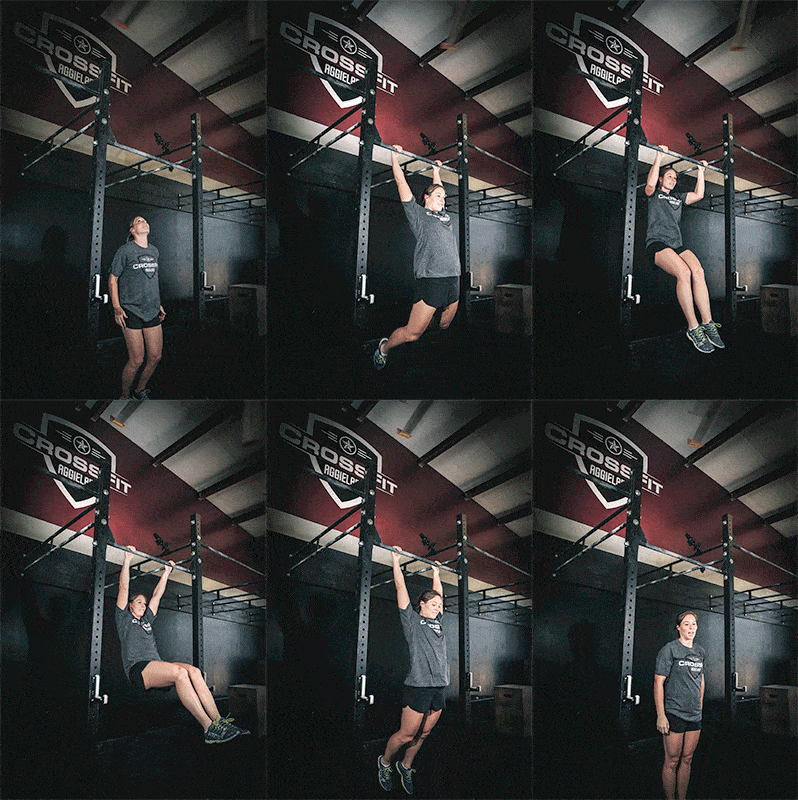

NOW, it is the humble opinion of our team that you should only be kipping AFTER you are capable of doing perfectly functional and safe pull-ups and chin-ups (in fact, many CrossFit gyms require qualifying strict pull-ups before you can kip).
Solution: Build strength and good position (the foundation!) before you worry about speed. You want to know how to drive a car before you learn how to race it!
In summary: don’t sacrifice good form for more pull-ups or chin-ups. You’ll create bad habits this way.
To check your form, simply record a video of yourself doing your pull-up variation and match it against the gifs and videos here. If it looks close, you’re doing great!
Or, you can have a Nerd Fitness Coach make sure you’re doing them correctly!
Advanced Pull-Up Variations


Once you’re able to do 3 sets of 10 pull-ups or chin-ups, it’s time to start thinking about upping the difficulty.
You have two options:
OPTION #1: Continue to get better at doing more reps – 3 sets of 12, 3 sets of 15, 4 sets of 20, etc.
OPTION #2: Start doing other types of pull-ups.
Here are some advanced pull-up variations that you can start doing:
#1) Wide Grip Pull-Ups:
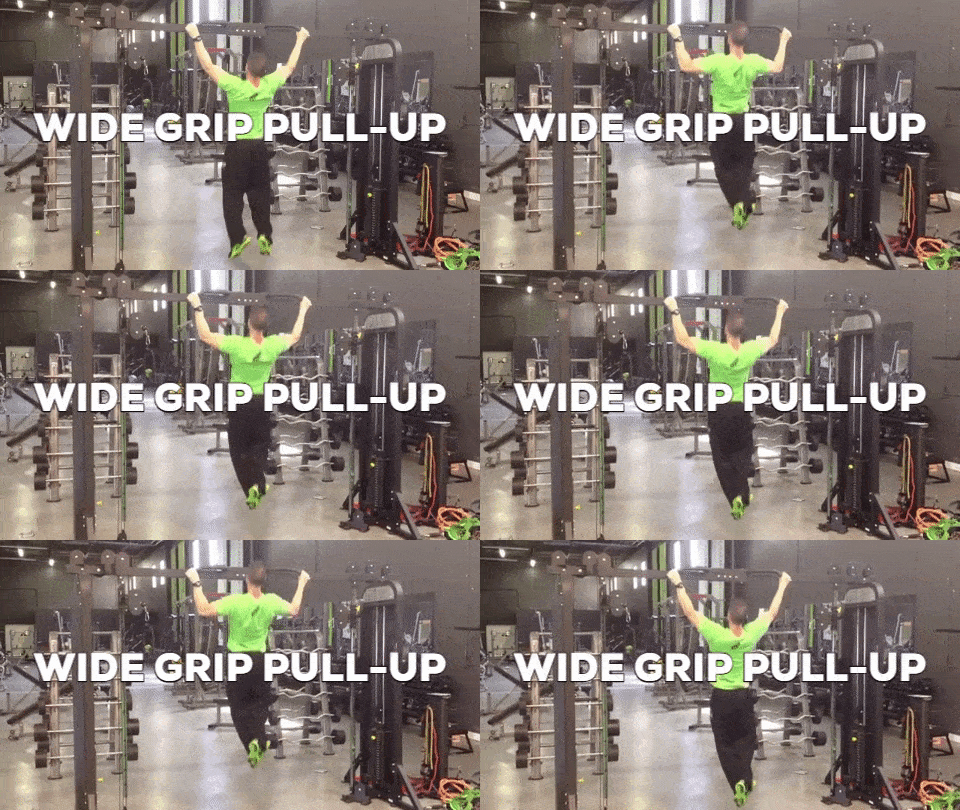

Grab the bar WAY out with both hands. With your grip further out, it’ll require even MORE strengthen from your back (remember our pull-up vs. chin-up discussion).
#2) Side to Side Pull-Ups:
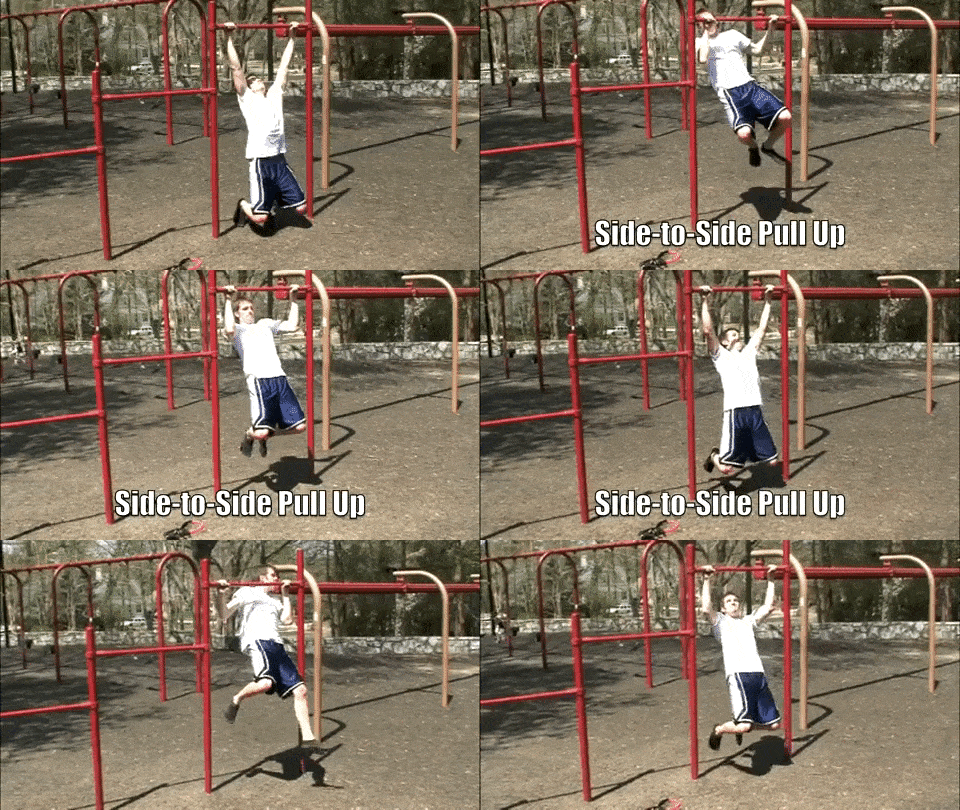

#3) Ring Pull-Ups
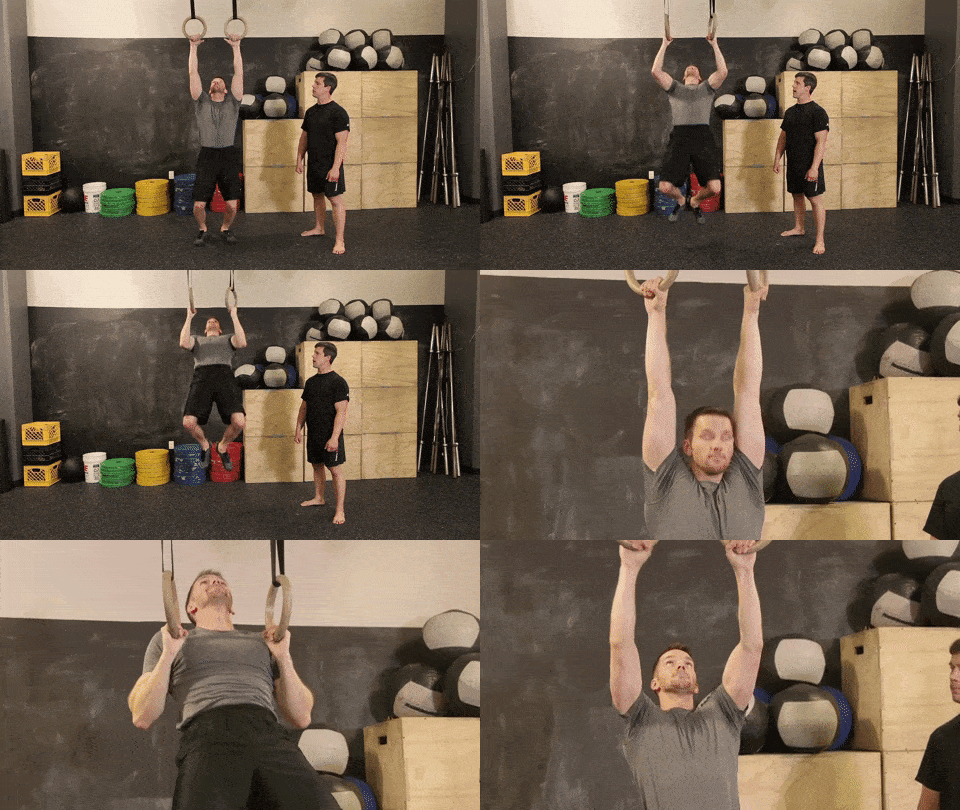

Rings hanging from the ceiling are inherently less stable than a pull-up bar. Thus ring pull-ups engage your core more as you stabilize yourself during the movement.
Want in on some ring action? Read our full guide on gymnastic rings workouts for more.
#4) Towel Pull-Ups
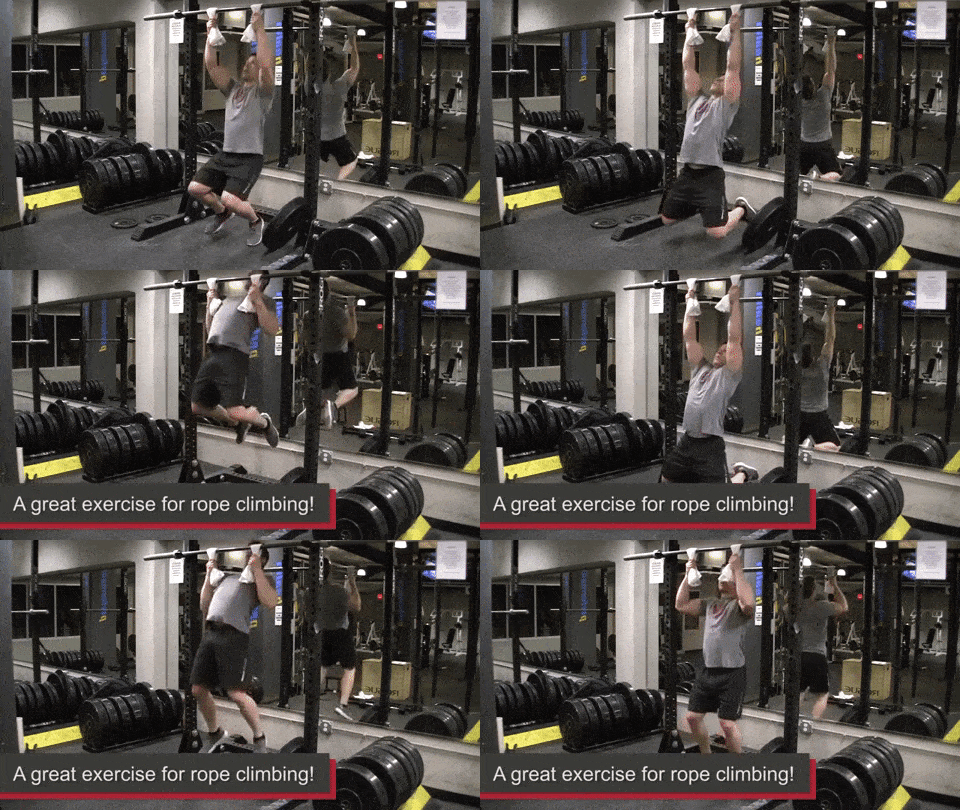

If you’re trying to improve your grip strength, try utilizing a couple of towels for your pull-ups. You’ll build lots of strength in your hands as you grasp the towels during the movement.
#5) L-Sit Pull-ups
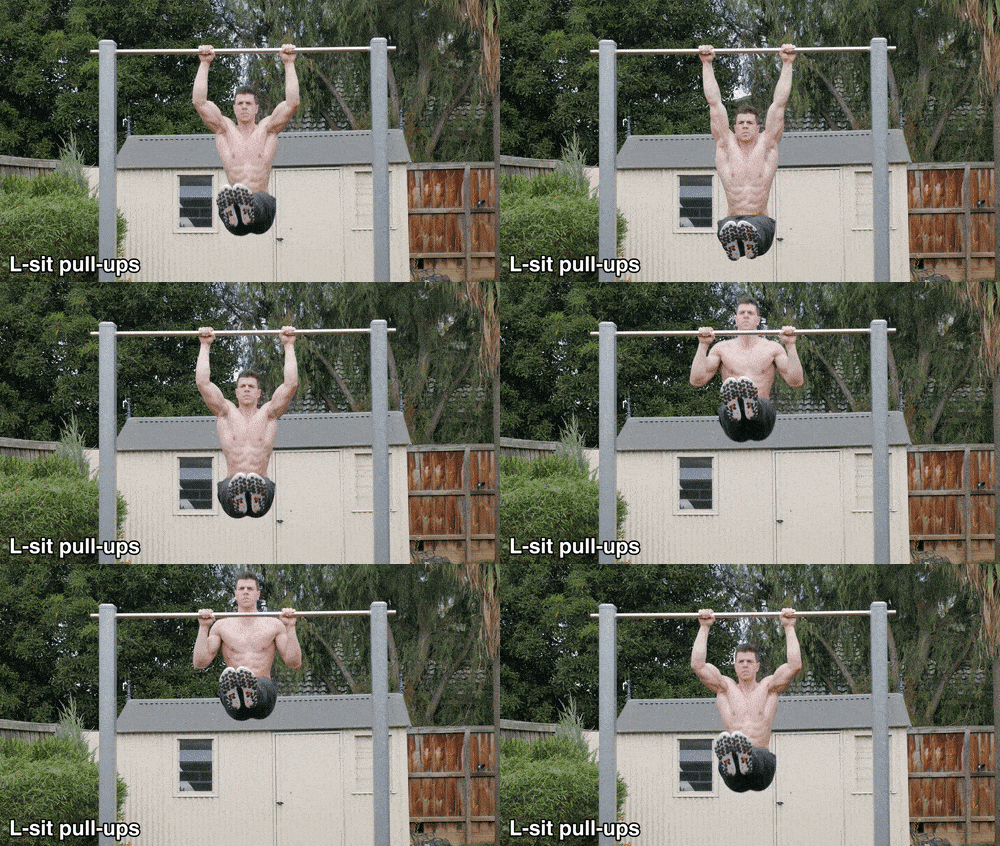

Raise your legs straight in front during your pull-up. This will challenge your core like you wouldn’t believe.
#6) Clapping Pull-Up


The trick here is to have enough power to explode above the bar so you can clap your hands. The next trick is to grab the bar in time to bring yourself back down.
Be careful here.
#7) One-Arm Pull-Ups
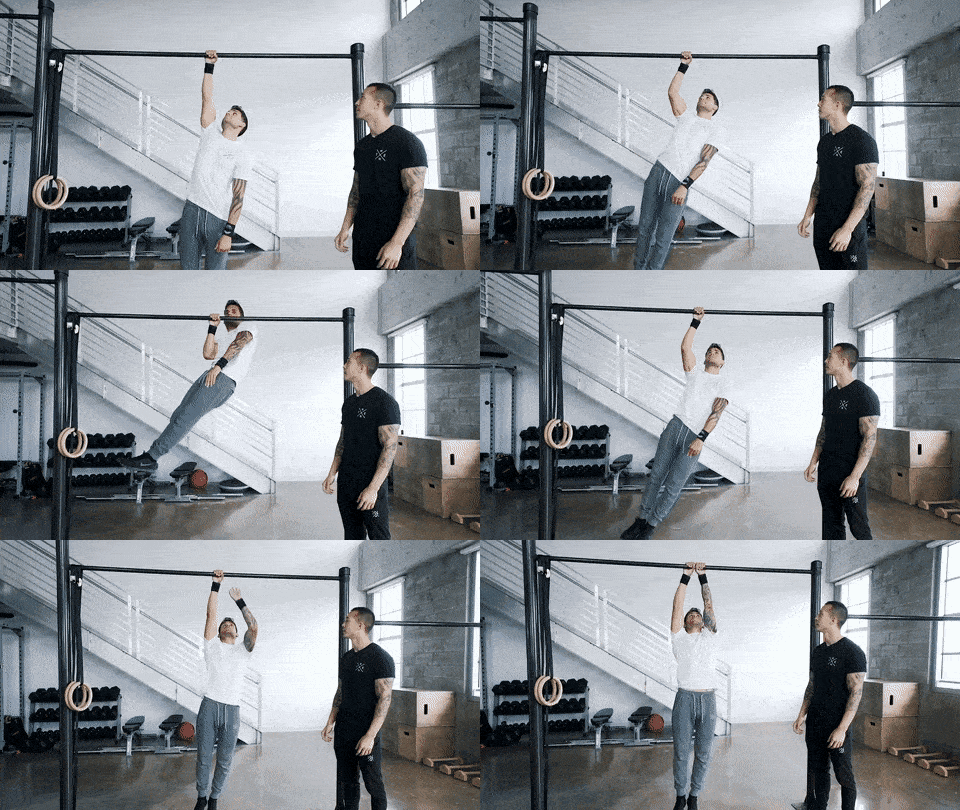

This is the most difficult pull-up variation you can do, what with the whole only using one arm business.
To keep yourself stable during the movement, keep your inactive arm close to your body while you pull.
If you start doing one-arm pull-ups, email us. Seriously.
That should get you started experimenting with pull-up variations to increase the difficulty.
The other way to “progressive overload” your pull-ups is to add weight to the exercise, which we’ll devote our next section to.
How to Do Weighted Pull-Ups


Personally, my favorite thing to do in a gym is weighted pull-ups:
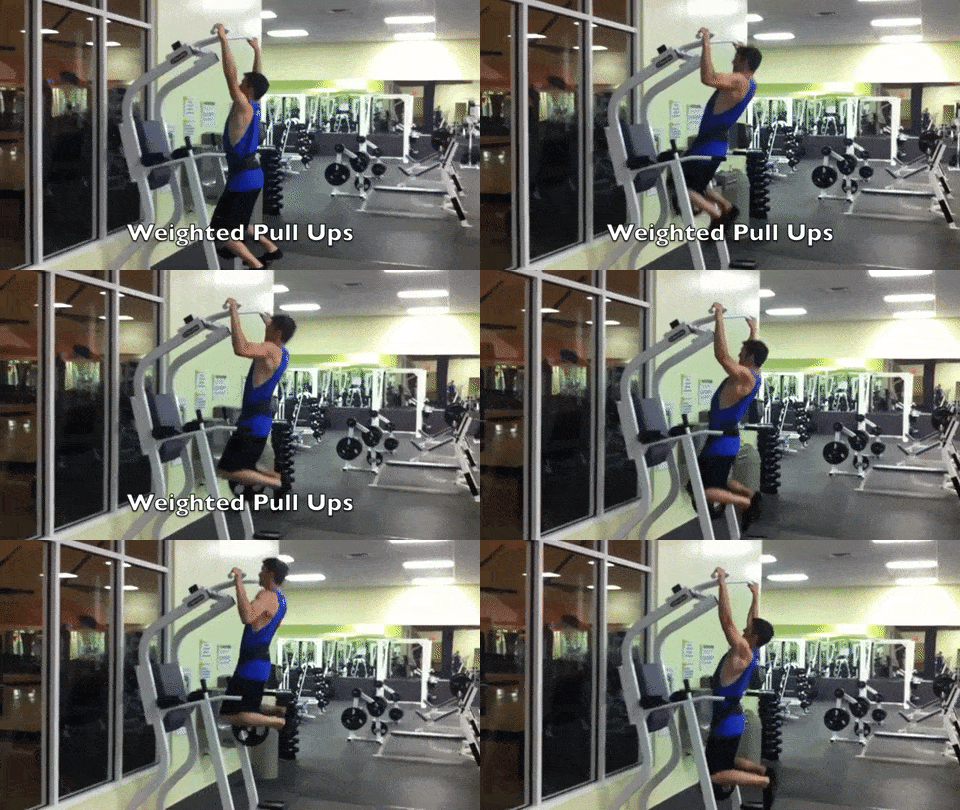

If you’re at this level and interested in doing so, let me show you how to do them.
How to do a weighted pull-up:
- Get a weight belt. I bought this one on Amazon and it’s worked out incredibly well for me. I’ve tried doing the whole “put weights in a backpack” thing, and it certainly works. But the angle of the weights hanging off your back is weird. With a weight belt, the weight hangs down between your legs (not a euphemism) so it feels more natural.
- Add small amounts at a time. Most gyms will have 2.5 lb (roughly 1kg) weights; you might feel stupid putting on a big weight belt and only hanging a tiny weight off it, but you need to start somewhere.
- Consistently add more weight. I’ll warm up with two sets of 5 pull-ups with no extra weight, and then do 3 sets of 5 weighted pull-ups. If I can complete all 3 sets of 5 reps (with my chin over the bar for every rep), I’ll make a note to add 2.5 or 5lbs (1 or 2kg) to my weight belt for the next time.
If you want any help scaling your workouts, check out Nerd Fitness Journey. We created our pull-up adventure for all skill levels: from someone just starting out to someone who can do pull-ups with no assistance.
No guesswork needed on scaling your workout, just jump into the app and follow the next steps.
Including Pull-Ups in Your Workout


You now know how to do a pull-up, a chin-up, and tons of variations.
The only thing left to cover is WHEN to do pull-ups.
For that, let’s talk about building your own workout.
Unless you’ve been strength training for years and know what you’re doing, we recommend that you pick a full-body routine that you can do 2-3 times a week.
You want a workout routine that has at least one exercise for:
- Quads (front of your legs).
- Butt and hamstrings (back of your legs).
- Chest, shoulders, and triceps: (“push” muscles).
- Back, biceps, and grip ( “pull” muscles).
- Core (abdominals and lower back).
Pull-ups, chin-ups, and all the variations covered would make a great addition for your “pull” muscles (back, biceps, and forearms).
So a sample workout routine that includes pull-ups could look like:
- Barbell squats: 5 sets of 5 reps.
- Barbell Deadlifts: 3 sets of 3 reps.
- Push-ups (or dips): 3 sets of 15 reps.
- Pull-ups (or chin-ups): 3 sets of 8 reps.
- Planks: 3 sets, 1 minute hold each.
Boom! Five exercises you can do at the gym and then go home.


Wanna avoid the gym and just train at home in the first place?
No problem! Lots of our coaching clients choose to train and do pull-ups in their homes. All you’ll need is:
- A sturdy pull-up bar.
- Lots of bodyweight exercises to choose from.
Seriously, you don’t have to leave home to start doing pull-ups and get in shape.
Want proof?
Meet Christina:
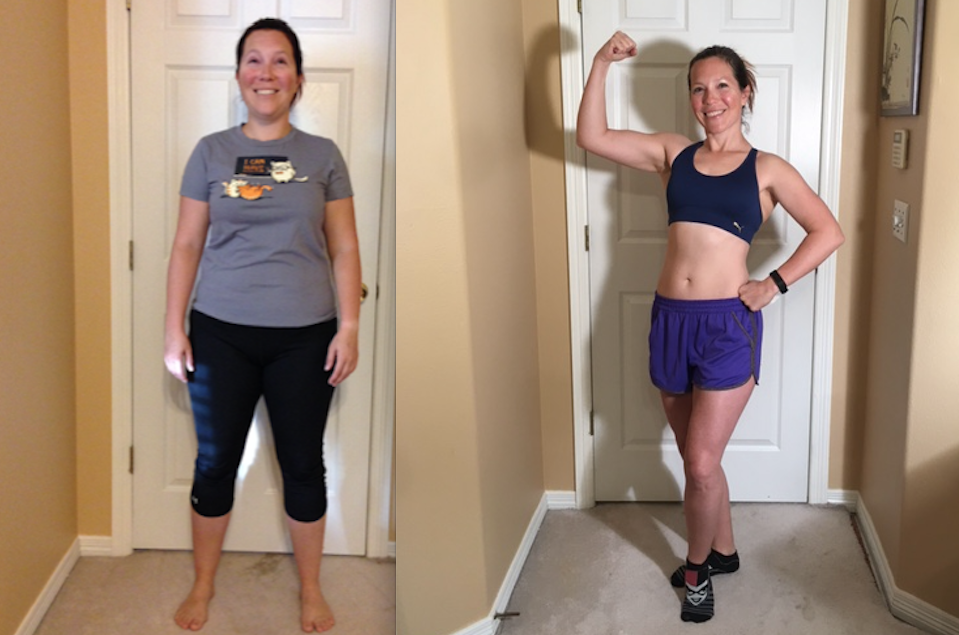

Through our coaching program Christina learned to pick herself up, literally, and now crushes her training without ever stepping foot in a gym. You can read her full story right here.
Start doing pull-ups regularly and I promise you your life will improve for the better.
If you’re interested in progressing but want help on the next step, we’ve built 3 options that might float your boat:
#1) If you want step-by-step guidance, a custom strength training program that levels up as you get stronger, and a coach to keep you accountable, check out our killer 1-on-1 coaching program:
#2) Exercising at home and need a plan to follow? Check out Nerd Fitness Journey!
Our fun habit-building app helps you exercise more frequently, eat healthier, and level up your life (literally).
Try your free trial right here:
3) Join the Rebellion! We need good people like you in our community, the Nerd Fitness Rebellion.
Sign up in the box below to enlist and get our guide, Strength Training 101: Everything You Need to Know. It’ll help you start incorporating pull-ups and chin-ups into your training:
That should get you going mastering the pull-up.
Alright, your turn:
Do you head to the gym to crush pull-ups?
Do you have a pull-up bar in your own home?
Any tips or tricks we missed?
Let us know in the comments!
For the Rebellion,
-Steve
PS: Check out our other articles on pull-ups:
- Get Your First Pull-up
- 5 Common Pull-Up Mistakes
- The 5 Best Pull-up Alternatives (How to Do Pull-ups Without a Bar)
PPS: Want to learn more? Read the rest of Strength Training 101 series:
- Strength Training 101: Beginner Strength Workouts
- 6 Gym Workouts for Beginners
- How to Find a Good Personal Trainer
- Strength Training 101: Inverted Rows
- Strength Training 101: How to Squat
- Strength Training 101: The Press
- Strength Training 101: The Deadlift
###
Photo Sources: Scenes from an empty lot in Brooklyn, vol 1, Morning run with the Fitbit, Tampa Bay AirFest 2018, Girl on Monkey Bars, Weighted Pull Up, Sunset Nature Climb Animal Tree Monkey Wilderness.
GIF Source: Kipping Pull-up, L-Sit Pull-Up, Clapping Pull-Up, One-arm Pull-up.


